Saturday, March 12, 2011

Etched Glass Wedding Present Tutorial


Yesterday my cousin got married and invited us to the Reception. Being the Crafty Kid that I am I wanted to do something special. Before we continue I need to tell you a little about myself. I dream big! I want to go all out and be fabulous. One example, for my sister's Bridal Shower I planned to make cake balls hand dipped in chocolate and decorated by hand. When I realized that wasn't going to happen, I wanted to make a sheet cake and on each piece have a handmade blue white chocolate heart. Walmart didn't have blue candy bits, so I ended up just using blue sparkle frosting to make the hearts on the cake.
With that said, I had grand plans for what I was going to make. I knew I wanted to etch a glass casserole dish (I'd seen it here and loved it!) and if I had the money I wanted to make the insulated carrying case for it (from the same site). When I went to Walmart, I found a great deal on a glass pan kit. It had a 9X13 pan, 8X8 pan, a pie plate, a bowl and measure cup. With all that I didn't think the hubby would OK a carrying case too but I could still etch it. It turned out great! I thought I would show how I did it and some of the things I learned while I was doing it.


Supplies:
Glass Pan, Dish, Cup, etc.
Armor Etch
Stencil
Paint Brush

Difficulty: Medium
Time: under an hour
Cost: $10 for etch (at Robert's Craft)
+ the cost of a pan


1. Clean your glass really well before you start. Then attach your stencil to the pan with tape or stencil glue. (Instead of Etching the letters, I was difficult and etched everything except the letters)


2. Using a paint brush glob on the etch in a thick layer (I didn't do mine thick enough so I had to do it twice). What about 5-10 minutes.


3.This is what it looks like after you wait. You can see that it wasn't thick enough. Really glob it on so all you see is white and not the glass underneath.


4. Once you wash it off, dry it and Ta-dah! A Personalized Wedding gift. I really wanted to write more but this pan has a beveled edge on the bottom so that limited my space.


This was really fun! I really don't have patience so these crafts that happen right before your eyes are perfect for me! I hope they like it!

Friday, March 11, 2011

Homemade Devil's Food Cake


Last week my grandpa turn 82, which was perfect because I was in the middle of reading Devil's Food Cake by Josi S. Kilpack (click HERE for her web site) and this recipe sounded delicious. Sunday morning, I decided to whip it up before church (bad idea on Fast Sunday, by the way) and take it to him after dinner. It was AMAZING! Super rich, not as sugary as boxed cakes, and I had everything in the pantry. I liked it so much I thought I would share it with you guys. Just an FYI, Black writting is the actual recipe and the Orange is my additions.

Devil's Food Cake
Ingredient
-1 cup sour milk (1 cup milk + 2 teaspoons white vinegar or lemon juice or use 1 cup buttermilk) I used milk and vinegar
-2 cups flour
-2 cups sugar
-2/3 cup unsweetened cocoa I used Hershey's Natural Cocoa
-1/2 teaspoon salt
-2 eggs
-1 cup vegetable oil
-1 teaspoon vanilla
-1 cup boiling water
-1 teaspoon baking soda

For sour milk, mix milk and vinegar in a small bowl (I did it in one of my measuring cups). Set aside for 5 minutes.
In a large bowl, mix together all ingredients except the water and baking soda. I think it would be best to mix the dry together and then the wet so that everything is mixed well (most recipes do it that way). Mix until batter is smooth. Add the soda to the boiling water (kids love this part because it bubbles.) Add soda/water mixture to the batter. Mix well- batter will be thin. It took so vigorous whisking.
Pour batter into a greased and floured 9X13-inch pan (I just sprayed mine really good) and bake at 350 degrees for 35 to 45 minutes or until middle is set.
If using round cake pans, grease pans VERY well and cut a round of wax paper to fit inside the bottom of the pans to prevent cakes from sticking when removed. Let cake cool five minutes in pans before turning out onto a wire rack.
Serves 12.
You can also add a teaspoon of mint extract to the batter.

I think I'm going to make the 2 rounds and cut then in half so that there will be 4 layers. I'm hoping it will be like Magleby's.

My son had so much fun decorating this cake, I think I'll make him another one to just decorate.


Chocolicious Frosting

This is the Frosting recipe that goes with the Devil's Food Cake from the same book, Devil's Food Cake by Josi S. Kilpack. It is exactly what the name says, chocolicious!

Sandra's Chocolicious Frosting
-1/2 cup butter
-2 tablespoons shortening
-1 cup baking cocoa
-8 ounces cream cheese
-3 cups powdered sugar
-1 teaspoon vanilla

Melt butter and shortening. Whisk in cocoa and stir until smooth(my butter and cocoa clumped together so I added 2 more tablespoons of butter but it didn't help). Let cool until it is cool enough to touch. Add powdered sugar and vanilla. Mix well. Mine was thicker than I like so I added a tablespoon or 2 of milk.
Will cover two 9-inch layers or a 9X13 cake.

It turned out so amazing I would have eaten the whole bowl if I didn't have to frost the cake.

Thursday, March 10, 2011

St. Patty's Day Shirts


I'm really getting into St. Patrick's Day this year and I don't know why. I'm not Irish but I get excited seeing the 17th getting closer. I've come up with cute Patty's day ideas like the special pillowcase, a Goodie Bag from the Leprechauns, and even an all green dinner (you'll see these later) but I don't know why (maybe it's because my 26th birthday is coming and I'm trying to distract myself).ANYWAYS! When I came up with this idea for a shirt I was super excited!


Supplies:
Colored T-Shirt
Shapes and Letters
Spray Bottle
Bleach

Difficulty: EASY
Time: 30 minutes
Cost: $5 or more (depending on the shirt)

1. Take a piece of cardboard, metal, cutting board, anything (I used my plastic cutting board) and put it insides your t-shirt (this helps to keep the bleach from bleeding through to the other side or even into your carpet).


2. Lay out your shapes and letters to make a cute design. I'm lucky and have a Cricut Cutting Machine and I made the design all on my own.

3. Carefully spray bleach over the shirt. REMEMBER: Wherever you spray will change colors. If you don't want a certain place to change, don't spray that spot.


4. Remove the shapes and wait. You can wait with the shapes on but I like to watch the change happen so I removed them. Wait about 5 minutes or until you get the color you want. Then Rinse your shirt with water. REMEMBER: Your shirt will keep changing until you rinse it.


5. Wash and dry your shirt as normal. I even washed it with other clothes and things turned out fine (I rinsed the shirt before, really, Really, REALLY well).

And there your go! I had the Little Monster try it on when he first woke up to get some pictures and he LOVED it! He didn't want to take it off. I also made one for myself that says, "I'm LUCKY in Love." I thought that was more appropriate that the "Get LUCKY" my hubby suggested. Not too bad.

I know the shirt is backwards...The hubby was at work and I didn't have anyone to take the picture for me. Hence the mirror shot with my IPhone.

Tuesday, March 8, 2011

Date with Nate- Dinner and a Movie


I really loved doing the Date with Nate posts but lately, I've been slacking on dating my hubby. But I've made a promise to myself that I will get back into the swing of it. Last week we went to Dinner and a Movie with our friends, Jesse and Serena. My SIL, V, watched G for us and we went to see Rango. I've seen a lot about how they made this movie and I was really excited to see it. It was good, different but good. Johnny Depp was great as always and the animation was pretty cool. I give it a B.

After the movie, we went to P.F.Changs for dinner. Of course, we got the lettuce wraps and each picked an Entree and shared and at the end we even got dessert. It was really nice. I give it an A+. We had loads of fun with Jesse and Serena. We love hanging out with them and we always have a blast! Thanks guys for a great date night!


Jesse and His Triple Chocolate Mousse

Me and My Chocolate Cake

Serena, I think she was crying, it was so good.

Nate and His Strawberry Cheesecake
(He didn't believe me but I KNEW he was
going to pick this one. I know my hubby so well)

Monday, March 7, 2011

St. Patrick's Pillowcase

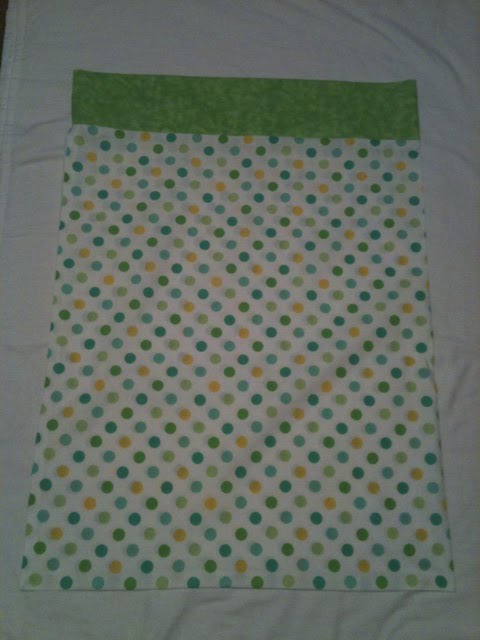
It's been a while since I've blogged and some of you might be wondering what I have been busy doing? Truth is...Nothing. I'm just a slacker, so I've decided to step it up and get crafting! I thought that for a fun tradition, that I'd make my son Holiday Pillowcases. For a couple weeks before and a couple weeks after a certain holiday, I'd let my son have these special handmade pillowcases. So here is my very first one!


St. Patrick's Pillowcase
Supplies needed:
3/4 Yard of Fabric
1/4 Yard of Accent Fabric

Time: 30 minutes
Difficulty: Easy
Cost: about $5

1. Fold accent fabric in half lengthwise with WRONG sides together (this way you wont have to hem it. I hate hemming!)


2. Sew the ends together to make a continuous piece.


3. Fold in half with the RIGHT sides together; Sew long side and 1 short side (this makes a bag)


4. Trim corners (to make nice sharp corners)


5. Turn larger fabric right side out and sew accent piece to it along the 1 open edge. (Sew the raw edge of the large piece to the sewed side of the accent piece)


6. Turn out the accent piece and press.


Presto! A cute pillowcase. You can buy special Holiday Fabrics at JoAnn's or another fabric store. I did like the 1 fabric that Walmart (I know, I know! Who buys fabrics at Walmart but I REALLY needed to craft and didn't want to drive) so I found this cute green and yellow fabric. If you have girls you can sew some lace between the 2 but I have a boy so No Lace for me! Enjoy and Happy St. Patrick's Day!